Thursday, November 10, 2011

Shake it out

Quick outfit of the day! :)


Cardigan: Forever21
Tank top: Supre
High waisted shorts: Supre
Scarf: Forever21
Glitter tights: American Eagle
Socks: Target
Studded shoes: ASOS
Purse: Candies for Kohl's
Ring: Forever21
Feather Earring: Made by me

Also, I CANNOT stop listening to this song! I just put it on repeat and dance around my room :)


Tuesday, November 8, 2011

Just wanted to post my makeup and hair look from yesterday! I got this awesome new curling iron from Fred Meyer yesterday and wanted to try it out ASAP

Remington Pearl Curling Wand

It's a clamp-less tapered curling wand with adjustable heat settings. So far I LOVE it! I can use it to give me soft touchable waves, or tight Taylor Swift looking zig zag curls. After I curled my hair, I ended up creating a french braid crown around my head, teased the back to create volume, and put it in a low pony tail. I might do a hair tutorial on it soon so let me know if you'd be interested in that! :) As for the makeup, I did a soft brown smokey eye with a frosty silver lid for some extra glam. (As always, click for larger images.)


Sunday, November 6, 2011

I swear, I am still alive.


Internet! I have not forgotten about you! After I got back from Australia, things have just been crazy. Surprisingly, it's also taken me a while to adjust to being back in Seattle and into fall mode. But I am ready to get back into the blogging swing of things. I know it's not much, but please accept this OOTD photo as an apology.


(Click for larger image)

Top: Supre (Purchased in Australia)
Dress: Vintage shop in Australia
Blazer: Silence and Noise
Leopard Wedges: Forever21
Feather Earring: Made by me


Friday, September 30, 2011

The city and stuff

Yesterday my mom and I walked around a ton and just explored the city. It is so beautiful here! Here are some photos of some things:

View of the city from the South Bay area
Random lizard

Cool trees and boardwalk

Mom

More river and city

Random pagoda

Cool flowers and stuff

Train ride from the airport to the hotel


Today my friend Dan showed me around a bit. Ate some pizza, had a few drinks, and good times all around. Dan is also kind of the king of night life around here, so I am making him take me out one of these nights with all the cool kids. From what I hear....gonna be some wild times. :)

Thursday, September 29, 2011

Greetings from Down Under!


I am in Australia! So the blogging for the next two weeks is most likely going to switch into travel blogging until I get back. So far I am loving it here. Staying right in the middle of Brisbane's city. It is beautiful. My mom and I walked around and explored a bunch today, below is a photo of me on this awesome boardwalk by the river, in this Central Park-esque area. Expect lots more photos in the next two weeks! I'm excited for more exploration :)

Thursday, September 22, 2011

Apologies/Must Have Products

I am SO SOOOOO SO incredibly sorry that I missed this week's Makeup Monday! It's only the second week and I already missed one. Things have been so hectic right now and they're about to get more hectic because I am going to Australia on Tuesday for two weeks! So I can't guarantee I will be blogging much during that time, but I will try my best.

To try to make up for missing Makeup Monday, here is a short list of my Top 5 Must Have makeup products! I wear all of these almost every single day and they are listed in no particular order.

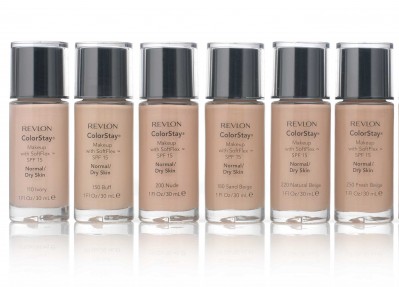
Revlon Colorstay Foundation
Hands down, the BEST drugstore foundation I have ever used. It blends so well into the skin and lasts all day. They have a very wide color range and even have two formulas: one for dry/normal skin and one for combination/oily. I have never had any problems with breakouts or drying when using this foundation on anyone's skin. I just set it very lightly with a translucent powder (only on the oily parts of the face) and it looks photoshop perfect.

MAC Paint Pots
I use these every day as a base for my eyeshadow. A lot of people like to use a primer (like Urban Decay or Too Faced), but I find that I like the MAC Paint Pots the best. They have a color to them, which is great for whether you want to cancel out the redness in your eyelids, or intensify the color of your eyeshadow. They don't crease your eyeshadows and they provide a base that is sticky enough that your eyeshadows stick and appear more intense, but a smooth enough base that blending shadows becomes very easy. My favorite is Soft Ochre, it has a yellowish tint to it which evens out the skin tone and gets rid of redness. Even just by itself with nothing on top, paint pots are great.

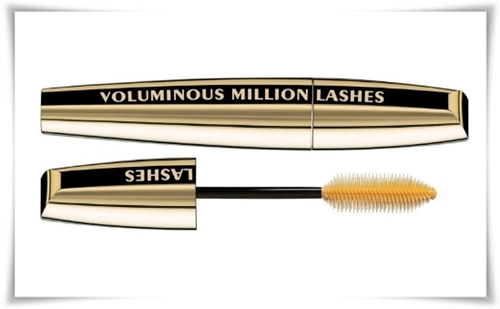
Loreal Voluminous Million Lashes Mascara


I have been using this mascara ever since it came out and I am addicted. Not only does it give great volume and length, but the large brush prevents clumping AND allows for a great full effect in only a couple of quick coats. However, I do find that the formula is a bit too wet when you're using a brand new bottle, but after a few days of usage it becomes dry enough that you can layer and layer mascara to your heart's content!

Loreal Extra Intense Kohl Liner in Carbon Black


At only around $7, this liner beats every single "high end" kohl liner I have ever used. It is SO black and pigmented, blends smoothly and easily, and then dries after a minute and doesn't budge at all! Completely smudge-proof and waterproof. Definite must-have.

A matte medium brown eyeshadow


Whether you are doing a night time smokey eye or a light day time look, a matte brown eyeshadow is a MUST HAVE. I use it in every single look I do, even if it is just a light dust over the crease area. It is what blends your highlight and lid shade together to create a seamless look. Some of my favorites by MAC are Cork, Wedge, and Saddle, but you can find a great one from many different brands. Look for a matte brown that is a few shades darker than your skin tone. Your eye makeup will look 10 million times better if you blend out your crease with it!

Hope this was a little helpful for you all! :)


Saturday, September 17, 2011

DIY Beauty Dish

I finally got around to making my own DIY beauty dish (using this tutorial)! Mine is definitely a little more ghetto though (lots of hot glue and tape was involved in the making of this) but it still works just as great and took me less than an hour to put together. Best part: it only cost me $3!

Finished set up (taken with my iPhone in the instagram app):


Didn't have a model around so I just used my mom and myself....and mom said she would kill me if I put her on the internet. So you get me instead!
Photos taken with my Canon 5DMKII and 50mm 1.4 lens. For lighting, I skipped out on the reflectors and just used one AB800 shot through the DIY beauty dish because I wanted to see how it does on its own (click for larger image):


I'm pretty satisfied with the results, but I think I'm going to modify it a little (like actually paint the outside black). Overall, excited to play with my new toy some more! Holler at me if you need head shots :)


Monday, September 12, 2011

Makeup Monday!

Welcome to my first edition of MAKEUP MONDAY!
Today I teach you how to achieve my favorite bronze smokey eye.


Products used

MAC Soft Ocre Paint Pot

Eyeshadows:
MAC Ricepaper
MAC Woodwinked
MAC Cork
Urban Decay Darkhorse
MAC Carbon Black
MAC Saddle

Urban Decay Aqua Eyes in Black
Loreal Volumninous Million Lashes Mascara in Black

Sunday, September 11, 2011

Welcome!


Welcome to my new corner of the internet! I decided this was a better place to house my crafting, art, thrifting, fashion, and beauty antics. Stay tuned for lot of fun things!